Tag Archives: mendelmax

PrintrBoard SD Card & Boot-up fix

I had some trouble using the PrintrBoard’s built in SD card reader using Marlin firmware. I also had an issue with the Y-endstop, which I thought was unrelated, as the board would not boot if the Y-endstop was pressed (ie. if the bed was homed). The only help I found was from Lincomatic’s blog again but this time in a comment from “RustyPaint”, found here.

The issue is that the pin used by the Y-endstop is connected to the SS pin of the processor. So if the Y-endstop is closed it interrupts the SPI bus which the processor uses to talk to the SD card. The conflict also causes the board not to boot if the Y-endstop if pressed.

So the work around is that you disconnect the Y-endstop from the PrintrBoard and plug it in to the free Emergency endstop pins. You must then also configure the firmware to look at the E-stop pins instead of the Y-stop.

In pins.h, within the Marlin firmware, change line 918 from:

#define Y_MIN_PIN 20

to

#define Y_MIN_PIN 37

This solved the booting problem and now I can print from an SD card.

(Update: Just make sure your file name is a maximum of 8 characters long and the extension is a maximum of 3 characters. For example “Myprint1.g”)

Thanks to Nicolas Vicuña for pushing me to find a fix and help testing it.

NB: This post gets a fair bit of traffic.  If this information helped you at all then please leave a comment.

Tagged , , , , , , , ,

Arduino – PrintrBoard

I had some issues getting my PrintrBoard talking to the Arduino IDE but after digging the depths of the internet I found a few trick to making this work.

Credit for this post goes to Lincomatic. I’m posting my methods and what I did to get my board working. I also think having this information available it good for everyone. So…

I’m working on OSX 10.7.4 with a PrintrBoard Rev. D and here are the files I’m using:

Arduino v1.0.1 – Link

Teensyduino v1.09 – Link

Teensy boards update, courtesy of Lincomatic, modded by me – Link

Marlin Firmware for PrintrBoard, courtesy of Lincomatic – Link

Here are the steps I went through:

  1. Install Arduino IDE.
  2. Install Teensyduino.
  3. Right click on the Arduino application, click “Show package contents”
  4. Navigate to “/Contents/Resources/Java/hardware/teensy/” and place the Teensy boards update files here.  Overwrite any files if you’re asked.  This installs the correct information to connecting to your new Bootloader.
  5. Run Arduino, load the Marlin.PDE file, select “[BootloaderCDC]Teensylu/Printrboard” in the Tools – Board menu.
  6. Click Verify and make sure Marlin compiles correctly.
  7. Load the Arduino IDE, open the Marlin.PDE, select “[BootloaderCDC]/Teensylu/Printrboard” from Tools – Board menu, select the “dev.tty.usbmodem.1d11” (or similar numbers) serial port from Tools – Serial Port menu, click Upload.
  8. If successful, close the Arduino IDE, remove the boot pin jumper, press the reset button, load Pronterface (or whatever printing software you wish to use), select the “dev.tty.usbmodem.12341” serial port (note the different numbers from the bootloader mode) click “Connect” and you should be connected to your PrintrBoard.

Done!

Tagged , , , , ,

CDC Bootloader – PrintrBoard

I’d just like to add before I start that messing with the fuses and bootloaders may result in bricking your board, just don’t blame me if it goes wrong!

Credit for this post goes to Lincomatic.  I’m posting my methods and what I did to get my board working.  I also think having this information available it good for everyone. So…

I’m working on OSX 10.7.4 with a PrintrBoard Rev. D and here are the files I’m using :

CDC Bootloader, courtesy of Lincomatic – Link

AVRdude, “how-to install” link

Here are the steps I went through:

      1. Install AVRdude
      2. I bought and built the USBtinyISP kit from ladyada.net.
      3. Connect the 6 pin socket on the USBtinyISP to the 6 pin header on the PrintrBoard so the RED wire on the ribbon cable is closest to the SD card socket.
      4. Add a jumper to the boot pins of the PrintrBoard, power it up, then press the reset button.  (For Rev. A, B & C PrintrBoards you remove the boot jumper)
      5. To set up the required space to upload the bootloader and free up some extra pins on the PrintrBoard set the “fuses“.  To do this paste and run the following code into Terminal:

avrdude -c usbtiny -p at90usb1286 -U lfuse:w:0xde:m -U hfuse:w:0xdb:m -U efuse:w:0xf0:m

      1. Then upload the CDC Bootloader, (make sure the path for the hex file is correct*).

avrdude -c usbtiny -p at90usb1286 -U flash:w:BootloaderCDC.hex:i

(note AVRdude will give a verification error, ignore it as the programmer can program but can’t read back large files)

      1. At this point you should power down the PrintrBoard and remove the 6 pin cable.  You’re now ready to upload your firmware.

See the next post for how to configure your computer to upload the Marlin firmware to your PrintrBoard.

*the easiest way to get the right location of the bootloader.hex file is to type the first part “avrdude -c usbtiny -p at90usb1286 -U flash:w:” then drag the file into the terminal window over the text.  This fills in the location for the file, then don’t forget to type “:i” at the end of the line.

Tagged , , , , , ,

Printing

The First Print

Here are some shots of the first print.

Everything seems to be doing what it should, it’s a bit rough but I’m just happy that a set of bundled together parts can do this!


Printing some more

… and so it grows.  This is a 10x20x40 calibration block.  I think I need to sort my extrusion settings out though.


Tagged , , ,

It’s alive!!!!

Finished…ish

So after an intense soldering session it’s up and working.

There’s a bit of tiding up to do but there’s plenty of time for that.  There are a few parts that I want to upgrade already like to replace the threaded rod with leadscrews and to alter a few of the printed parts.

Time to get my print on!

Tagged , , , ,

…and then they all arrived at the same time

looking good

After waiting on parts for a few weeks they all arrive together.

The key parts I was waiting on were the GT2 belts and timing pulleys.  I can’t seem to find a supplier of GT2 timing pulleys in the UK, where are they hiding?

GT2 belts and timing pulleys are the best in terms of backlash.  Most belts and timing pulleys are used continuously in one direction and so there is no backlash, for our use however there is a LOT of back and to.

Heated bed fits the laser cut bed perfectly and looks amazing 🙂

I just need to make up the hot end (J Head Mk V-B) before fitting it to the extruder.

Before I start wiring up the printer I want to add some cable trunking to hide some of the ugly cabling.

Tagged , , , ,

Stepper motors

Step to this

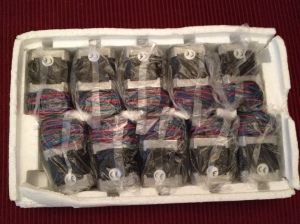
Our friend the post person has been again with a weighty box of joy!

These stepper motors are type SY42STH47-1684A so there’s plenty of power to spare.

They also come with a flat part on the drive shaft and a REALLY long cable.  There are plenty of cheaper motors that have a round shaft and / or short cables.

Time to bolt these on to the frame and double its weight.

Note: No, you don’t need 10 motors.  We’re actually building 2 MendelMax machines 😉

Tagged , , , ,

Fishy gears

Extrude this

Just a small update…

After quite a bit of research I’ve settled on “Greg’s Wade Extruder – Reloaded” (bit of a mouthful), with the slightly modified idler.

I also modified the extruder carriage to add a bracket to carry the extruder fan mount.

You can also see the laser cut bed assembled and ready for the heated bed.

Tagged , , , , ,

She slides so smooth

It grows

More parts have arrived (it’s like Christmas!)

Namely some 8mm steel rods, skate bearings (608zz) and Igus pillow block bearings.  This means I now have parts moving (sliding) on the machine!

You can either use linear bearings (LM8UU) or the Igus block bearings however you must print out the relative parts to fit either bearing.

Why didn’t I use linear bearings? Well, the block bearings are quieter, smoother and look more professional.  We’ll see how it goes when I start using the printer.

Tagged , , , , ,

Friggin’ Lasers

Oooh, fancy!

In an attempt to keep the overall quality of the printer up and to satisfy my lust for shiny things I decided to go for laser cut parts for the printer bed.  Could I have used cheaper printed parts? Yes, would they look as cool? NO! 😉

The smaller piece is mounted to the Y-axis rods and the larger piece holds the heated bed.

Tagged , , , ,